null

Luxury Liner™ 1 lb MLV Roll - Mass Loaded Vinyl

FREE Standard Shipping Details

×

FREE Standard Shipping

Free shipping is valid on any order shipped to a single address in the mainland USA. Standard shipping is covered. Overnight or 2-day delivery will cost extra and is not available on custom-made products.

  • Buy 5 - 9 and get 7% off
  • Buy 10 - 24 and get 12% off
  • Buy 25 - 39 and get 18% off
  • Buy 40 or above and get 24% off
$89.99
In stock.
This product ships in 1-3 business days.

Luxury Liner™ 1 lb Mass Loaded Vinyl Roll

Whether you have a big project or you just want to cut up your own mass loaded vinyl, Second Skin has the MLV soundproofing for the job. The Luxury Liner limp mass barrier roll comes in two standard thicknesses (1 lb / sqft or 2 lb MLV rolls) with the option to purchase a variety of lengths. All Second Skin MLV rolls are flexible, tear resistant (600 psi), odorless, fire resistant, and safe for automotive use (FMVSS 302 tested). Second Skin Luxury Liner is a building grade sound blocking material for any size soundproofing project, whether it’s the floor of a bus or a wall in a in your home theater. Keep the sounds you want IN and the sounds you don't OUT!


Features

  • Nominal 1/8” thick premium mass loaded vinyl
  • Each roll is 48" or 54" wide and comes in customizable lengths (up to 200 feet)
  • Weight: 1 lb per square foot
  • STC rating: 27
  • How does 1 lb MLV compare to the 2 lb MLV? 1 lb weighs half as much per square foot and is more flexible. The 1 lb density is used in most projects, and is very common for for automotive, rooms, walls, ceilings, PVC pipes, fences, and more.
  • Proudly made in the USA 


Specs 

 Dimensions   4’ x 10’, 4’ x 15’, 4’ x 25’, 4.5’ x 10’, 4.5’ x 20’, 4.5’ x 30’ 
 Thickness   Nominal 1/8" 
 Weight   1 lb per sq ft, 2 lbs per sq ft
 Color   Black
 Temperature Rating   175 °F 
 STC Rating   27


Resources 

 Spec Sheet   Luxury Liner Product Sheet 
 Architect CSI Spec   Luxury Liner MLV CSI Spec 
 Install Guide   Luxury Liner Install Guide 


Material Testing

Sound Transmission Loss

 Frequency (Hz)  125   250   500   1000   2000   4000   STC Rating 
 1 lb MLV Sound Transmission Loss (dB)   14   19   23   29   34   37  27
 2 lb MLV Sound Transmission Loss (dB)   19   20   27   34   38   43  32


 Tested Properties  Testing Method   Performance 
 Tensile Strength   ASTM D412   Minimum 400 psi 
 Elongation   ASTM D412   120% 
 Tear lbs / 1"   ASTM D624   77 
 Federal Motor Vehicle Safety Standard   FMVSS 302   Pass


Installation Instructions

Home & Commercial

Recommended Install Method: staples, screws, nails, or hung with reinforced grommets

Install Locations: soundproofing a room, walls, soundproof boxes, generator boxes, generator enclosure, soundproof fence, wrap noisy pipes (PVC), HVAC ducts, door soundproofing, mechanical rooms, machinery enclosures, bathroom wall treatments, office partition walls, cost-effective method for soundproofing windows


Steps to Soundproof a Wall

  1. Measure the height of the wall. Roll out so the length of the material matches the wall's height. Cut the mass loaded vinyl using a sharp utility knife and a T-square to ensure you make a straight cut. You can also cut Luxury Liner with a good pair of upholstery scissors. Just be careful you don't make crooked cuts!
  2. Fasten Luxury Liner to the wall using staples, screws or nails. Start attaching the MLV at the top of the wall, and work your way across ensuring the MLV stays straight.
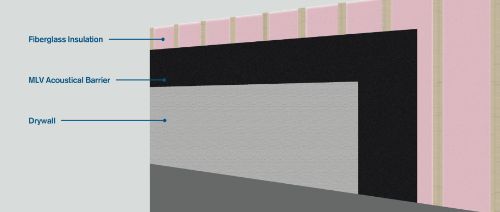
  3. The preferred installation method is to install Luxury Liner to a wall that has insulation and framing, but no drywall yet. There are a variety of installation methods that will improve performance, such as sound isolation clips or a double wall, but if you are not an experienced installer, we recommend to just focus on the basics, and ensure you have a sturdy install that is airtight and gapless.
  4. If the wall already has drywall, we recommend removing the existing drywall. If you choose to install Luxury Liner on top of drywall, it must be attached to the studs or joists. Drywall will not support the weight of MLV.
  5. After you've finished attaching the Luxury Liner to the studs and the bottom of the wall, repeat the steps you just did for your second cut off the MLV roll. Do not cover any wall outlets or light switches. Leave them exposed.
  6. As you work your way across the wall, keep the ends of the sheets directly next to each other. (AIRTIGHT!) If the edges connect on a stud, use acoustic caulk to seal the gap. If the edges connect over an air gap, use foil tape to seal the edges.
  7. After you've finished getting Luxury Liner up on the wall, use your acoustic sealant caulk to seal ALL of the edges, both between the sheets of Luxury Liner and between the Luxury Liner and the wood studs. THIS IS A KEY STEP TO ENSURE YOUR BARRIER IS AIRTIGHT. If you have not hung drywall, now's the time to begin installing drywall on top of the Luxury Liner.


mlv-on-a-wall.jpg


Have a Smaller Project? You should take a look at MLV Sheets.

Our Quiet Quilt line of sound blankets combine reinforced MLV with a vinyl facing for sound absorption and sound blocking. We also can put MLV inside a fabric wrapped panel to create a sound proof panel. Contact us for details.


Automotive Application Instructions

Recommended Install Adhesive: HH-66 Vinyl Contact Cement or Dual Lock Reclosable Fasteners (spray adhesive will not work on vinyl)

Install Locations: cabin side firewall, vehicle floor, trunk, on top of wheel wells, and back wall to reduce road noise in car

  1. For best results, Luxury Liner should be applied on top of a sound deadener, such as Second Skin Audio's Damplifier Pro or Spectrum. It’ll be the final layer of your multi-layer sound insulation bubble.
  2. Choose your decoupler. For the floor of vehicles, we recommend OverKill Pro (closed cell foam) or Heat Wave Pro (jute material) as a decoupling material between the Luxury Liner and the application surface on the car. OverKill Pro adds water resistant insulation, whereas the Heat Wave Pro is an OEM style thermal insulator and sound absorber. Both options work well.
  3. If upholstery or carpet is not already out, remove it. Ensure there’s no loose debris, rust, dirt, or waxy oils.
  4. Cut Luxury Liner to the desired size with a sharp utility knife or a good pair of scissors. Be sure to cut to a size that will allow you to reinstall the carpet and upholstery trim. Do not cover wires, drain holes, or mechanical devices. This part of the project is more art than science, as you need to have as few gaps as possible in your noise barrier while avoiding interference with other parts of the car.
  5. Use vinyl cement, such as HH-66 Vinyl Contact Cement, to adhere the Luxury Liner to the decoupler of choice. Apply one coat on the Luxury Liner Vinyl and one to the decoupling product.
  6. Apply a second adhesive to the decoupler and the foil side of your Damplifier Pro. You can reuse the contact cement again or another one you choose. The decoupling layer should be attached to the foil side of your sound deadener. Apply constant pressure over the entire surface for several minutes to ensure a solid bond.
  7. Seal any exposed edges or seams with Foil Insulation Tape. The goal is to create as close to an unbroken noise barrier as possible.
  8. Factory carpet can be replaced immediately. Aftermarket carpet kits can be placed directly onto the exposed Luxury Liner.


Common Product Uses

  • Soundproofing a room
  • Walls
  • Soundproof fence (outdoors)
  • Generator boxes
  • Generator enclosure
  • Wrap noisy pipes (PVC)
  • HVAC ducts
  • Mechanical rooms
  • Machinery enclosures
  • Bathroom wall treatments
  • Office partition walls